Chicken Curry

Chicken Curry 1
Here’s the recipe I promised I’d post to go with the curry powder recipe I posted last time. Once again, here it is holiday time, and unlike most other food blogs this time of year, I’m posting a recipe that doesn’t really have anything to do with the holidays. Or does it? It’s colorful, with lots of red and green– festive holiday colors! And this can be a healthier change of pace between the heavier, high fat holiday meals. Or for afterward, when New Year’s Resolutions kick in. Plus, a good, tasty curry every now and then will help get you through the long winter months to come.

This is a very healthy meal with its variety of vegetables, and even the curry powder may have health benefits. As for what oil to use, ghee is typically used in Indian cooking– it’s butter that’s been clarified by heating it and removing the milk solids. It’s supposed to be a little lower in saturated fat, therefore healthier than butter. But I just used regular butter, which I don’t think is really all that unhealthy used in reasonable amounts. Or you can use olive oil.

This can also be a pretty quick and easy meal to make. It’s not necessary to make your own curry powder, you can use store-bought curry powder and this curry will still be very good. And you don’t need to go through the process of browning the onions– it adds some depth and complexity to the flavor, but you can just cook the onions with the red and green pepper to save time. If you choose not to brown the onions use about half the onion this recipe calls for, because browning the onions really reduces their volume.

Ingredients:

  • 1 lb. boneless skinless chicken breasts
  • 1/2 red bell pepper
  • 1/2 green bell pepper
  • 3-4 medium to large onions
  • 5-6 garlic cloves
  • 1 tablespoon fresh ginger
  • 1 15 oz. can diced tomatoes
  • 3-4 tablespoons low-fat unflavored yogurt
  • Juice of one lime
  • 2-3 tablespoons curry powder
  • 1 tablespoon garam masala (optional)
  • 1-2 bay leaves
  • Added red pepper to taste
  • Chopped cilantro (optional)
  • 2 cups chicken stock
  • 4 tablespoons butter, ghee or olive oil
  • 3 cups cooked basmati rice

Serves about 4

1.
Get the rice cooking according to its package directions so it’s ready by the time the curry is. Now get the primary ingredients cut up: dice up the onions, mince up the garlic and ginger, chop the red and green pepper into chunks and cut the chicken into around 1″ cubes:

Chicken Curry Ingredients
2.
Now we’ll brown up the onions. If you want to make a quicker version of this, you can skip this and go on to step 3, and cook the onions with the other vegetables. Heat up two of the tablespoons of butter, ghee or oil in a large pan and cook the diced onions on medium-high heat, constantly stirring, until the moisture starts to cook out of them and they turn brown. This will take about 20 minutes to a half hour. Careful to just brown the onions, not burn them. Here’s what they look like when they’re almost ready:

Browning Onions for Curry
3.
Brown the chicken on medium-high heat with a tablespoon of butter/ghee/oil. I used a separate pan so I could brown the onions at the same time in the other pan, but if you don’t brown the onions you can do all the cooking in one pan. No need to make sure the chicken is cooked completely through– it’ll finish cooking in the curry sauce.

Browning Chicken for Curry
4.
Once the chicken is browned, remove it and cook the peppers (and onions if you’re not browning them) until softened up, adding another tablespoon of butter/ghee/oil if needed. Add the minced garlic and ginger once the peppers have gotten a good head start.

Cooking Curry Vegetables
5.
Deglaze the pan– add a little chicken stock to the pan that the vegetables and chicken cooked in, and use a spoon to scrape up the browned stuff in the pan from the chicken. Do the same to the pan with the onions if you browned them. Combine the cooked vegetables in one pot with the rest of the chicken stock, chicken, can of diced tomatoes, spices and bay leaves. Simmer in an open pot for at least a half hour. Note: I added some garam masala as well because I had it on hand, but if you don’t have it you can just use a little more curry powder instead.

Simmering Chicken Curry
6.
When it’s done simmering, add the lime juice and mix in the yogurt. Add some red pepper if it’s not spicy enough for you. Serve over the rice. Add some fresh chopped cilantro as a garnish if you like. Enjoy!

Chicken Curry 2

Curry Powder

Curry Powder

I’m back, after taking several months off. And what do I come back with after all that time– recipes for creative things to do with your Thanksgiving leftovers, like most food blogs will do this time of year? No, I have to be different. Why a curry powder recipe post on Thanksgiving weekend? It is actually related to Thanksgiving leftovers: We go to Kristina’s parents for Thanksgiving, so my only experience with cooking turkeys so far is smoking a whole turkey. But we get plenty of turkey leftovers to take home, so I used the bones to make a big batch of turkey stock, and then I used some of the stock and turkey meat to make this Curried Turkey Soup Recipe from Simply Recipes, which was really good.

Why go to all the trouble of making your own curry powder, when you can just buy it ready-made anywhere? And why do I keep asking and answering my own questions in this post? Well, there’s a couple reasons why it’s nice to make your own curry powder from scratch. And it’s really not all that much trouble. First, you start with spices in their whole, unground form, and unground spices will stay fresh a lot longer than when they’re purchased pre-ground. So your curry powder, made in small fresh-ground batches, will be at the peak of flavor. Also, you can adjust things to suit your taste. The mad scientist in me likes experimenting with amounts and types of ingredients to fine-tune what I like best.

Although I’m using my curry powder to try a recipe from the great Simply Recipes site this time, I’ll use this curry powder in my own chicken or lamb curry recipe in an upcoming post.

Ingredients:

  • 2 1/2 tablespoons coriander seeds
  • 1 tablespoon cumin seeds
  • 1 tablespoon mustard seeds
  • 1 tablespoon black peppercorns
  • 1 teaspoon fenugreek seeds
  • 1/2 teaspoon cardamom seeds
  • 1 tablespoon powdered turmeric
  • 1 teaspoon powdered ginger
  • 1/2 teaspoon powdered red chili pepper or two dried peppers
  • 1/2 teaspoon powdered cinnamon or two cinnamon sticks
  • 1/4 teaspoon powdered cloves or 3-4 whole cloves

1.
Go spice shopping! Hopefully you have an Indian grocery near you. If not, it may be difficult to find all the proper ingredients, so you may have to shop online for them. I recently stopped by an Indian grocery near where I work and stocked up on spices. Indian groceries are a great source to get spices very inexpensively. And not just spices typically used in Indian-style cooking– things like whole bay leaves are much cheaper than they typically are at other stores. Mustard seeds, chili pepper, and many other spices you can use in many different styles of cooking can be found here. I bought all of these spices for under $25.00:

Spices Purchased
2.
Measure out the spices. Now, the plan is to start with as many spices in their whole form as possible, so they can be ground up fresh. But you may not have everything in whole form on hand. In the picture below the only ingredients I started with in powder form are turmeric and ginger, because these related vegetables come in root form, not seeds, like many of the other ingredients. So it’s easier to buy these in pre-dried and pre-powdered form. Also, I didn’t have whole cloves, and whole dried cloves don’t grind up easily, so I used powdered cloves. You may not have whole dried red chilies or whole cinnamon sticks, so it’s perfectly fine to use chili powder or ground cinnamon instead. The spices that are best to start out with whole are the dried seeds– cumin. coriander, fenugreek, cardamom, mustard, and black pepper– because we’re going to further bring out the flavor of these by toasting them before we grind them up.

In the picture below, on the plate, in clockwise order starting with the peppers– whole dried red chili peppers, black peppercorns, cardamom seeds, fenugreek, mustard seeds, cinnamon sticks, coriander seeds and in the center, cumin seeds. In the small bowl, clockwise from the top are ground turmeric, cloves and ginger:

Curry Spices-Whole

3.
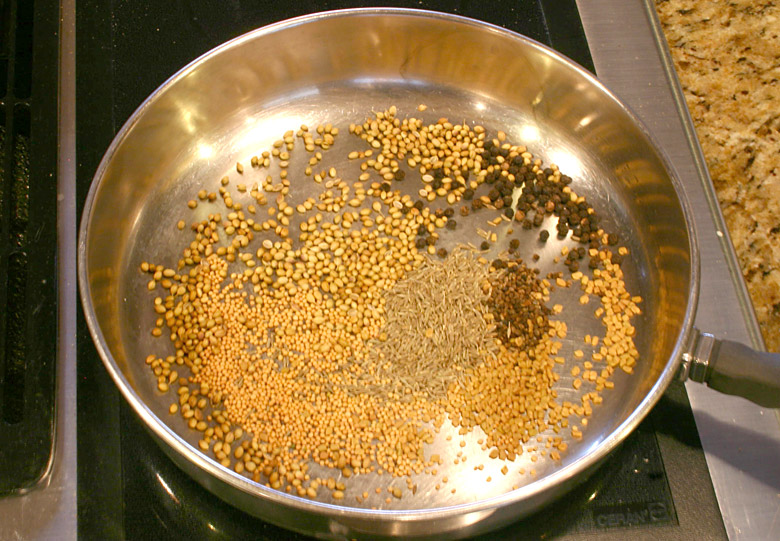
Now we’ll toast all of the dried seed spices– everything on the plate in the step 2 pic, except for the chilis and cinnamon sticks. just add the spices to a pan wide enough that they’re spread out in a single layer, on medium-high heat, and shake them around in the pan until they just start to lightly brown- careful not to burn them:

Toasting Curry Spices

4.
Now grind up all the whole ingredients, either in a dedicated spice grinder, food processor, or whatever you can use to get everything in powdered form. I use an old coffee bean grinder that I now use exclusively for spices. When the whole spices are mostly ground up I throw the pre-ground spices in for a few more spins of the grinder just to help mix everything up:

Grinding Curry Spices

This recipe makes about a 1/2 cup of curry powder, which (depending on how curried you like your curries) will probably be good for two meals. The unused curry powder will stay fresh in a sealed container for a few weeks. enjoy!

Stir-Fry Pepper Steak

Stir Fry Pepper Steak

Back when I was a single college student, not as into cooking as I am today, there was a pepper-steak making kit, I think made by La Choy, that I liked making. I don’t know if it’s even sold anymore. You’d buy the steak separately and cut that up, but the vegetables came pre-cut in a can, along with a little packet of powder you’d mix with water to make the sauce. So it was mostly pre-made, but involved just enough cooking to make you feel like you accomplished something. And it was tasty.

But those preserved vegetables that came out of the can probably weren’t quite at the peak of their nutritional value. These days I still sometimes get the hankering for a simple stir-fry, but I use better and fresher ingredients. This is quick, easy and really good.

Ingredients:

  • 1 lb. sirloin steak
  • 1/2 red bell pepper
  • 1/2 green bell pepper
  • 1 bunch green onions (scallions)
  • 1 cup sliced mushrooms
  • 1 tablespoon minced ginger
  • 4 garlic cloves, minced
  • 1 15oz. can bean sprouts
  • 1 cup dry rice (about 3 cups cooked)
  • 1 Tablespoon corn starch
  • 2 Tablespoons soy sauce
  • 15 oz. low-sodium beef stock
  • 2 Tablespoons peanut oil
  • 1 teaspoon black pepper

1.
Start cooking the rice according to the rice brand’s cooking instructions. It should take about 20 minutes to cook- just in time for the stir fry to be done cooking.
2.
Cut the red and green peppers into thin strips. Slice up the mushrooms. Cut the green onions into about 1/2″ strips. Mince the garlic and ginger up finely. Cut the steak into thin strips similar to the peppers. Remove the bean sprouts form the can and drain. Now most of your work is already done:

Chopped Stir Fry Ingredients

3.
Now we make the sauce. Mix a heaping tablespoon of corn starch with a little water. Mix that into the beef stock, and add the soy sauce and black pepper:

Stir Fry Sauce

4.
Now heat a couple tablespoons of peanut oil in a large pan, and brown the steak strips with the garlic and ginger. If you have a wok with gas stovetop burners, by all means use that- I have a wok, but alas my stove has electric burners so I use a flat pan to get the temperature hot enough– stir fry should involve high heat and plenty of stirring:

Steak, Garlic and Ginger

5.
Add the remaining vegetables except for the bean sprouts, and stir-fry until the vegetables are cooked just enough to be still somewhat crisp and still brightly colored:

Meat And Peppers

6.
Add the bean sprouts and sauce and cook a little longer, stirring, until the sauce thickens up a little. Serve over the rice. Enjoy!

Grilled Lamb Chops with Grilled Asparagus

Grilled Lamb and Asparagus

We finally had some warm spring-like weather fit for grilling this weekend. 72 degrees on Sunday-very welcome after the brutal winter we endured. I had a little venison to grill that my brother-in-law gave us, but I didn’t think it would be enough for dinner. So I decided to pick up some lamb chops. I used a marinade I’ve used on cuts of beef before which works just as well on lamb chops (and venison, too!). The marinade in this recipe is for just a few chops, so if you have more to grill feel free to double the marinade amount.

The grilled lamb chops turned out delicious! Similar to a fine cut of steak, but different enough in flavor to be a nice change of pace. They’re definitely going into my summer grilling rotation. The venison was very good too, but I’ve had grilled venison before, and I knew what to expect. The lamb chops were unexpectedly tasty. I’ve eaten lamb plenty of times in different dishes and cooked various ways, but I don’t know if I’ve grilled lamb chops anytime recently, and these were nice, thick-cut chops, looking like miniature T-bone streaks.

For sides I picked up some asparagus– grilling asparagus directly on the grill is really simple and one of my favorite ways to cook it. I also made a batch of mac and cheese, Clarkston Union style.

Ingredients, lamb chops + marinade:

  • 4 lamb chops
  • 1/4 cup soy sauce
  • 1/2 cup red wine
  • 1/4 cup olive oil
  • 1/2 teaspoon dried rosemary (or 1 teaspoon fresh)
  • 4 cloves of garlic finely minced or crushed in a garlic press
  • 1 teaspoon black pepper


Ingredients, asparagus:

  • 1 lb. asparagus
  • 1 tablespoon olive oil
  • salt
  • pepper


1.
Mix the marinade ingredients and marinade the chops for anywhere from 4 hours to overnight.

Marinating Lamb

2.
Fire up enough charcoal to cover 1/2 the grill (or turn the burners on high on one side of the gas grill, if you must use one). Same grilling method as in my Perfectly Grilled Filet Mignon post: First brown the outside of the chops on both sides by quickly grilling over direct heat, then move to the cooler indirect side of the grill to finish cooking. I also briefly soaked a few apple and hickory chips and threw them on the coals for a smoky flavor.

grillingLamb

3.
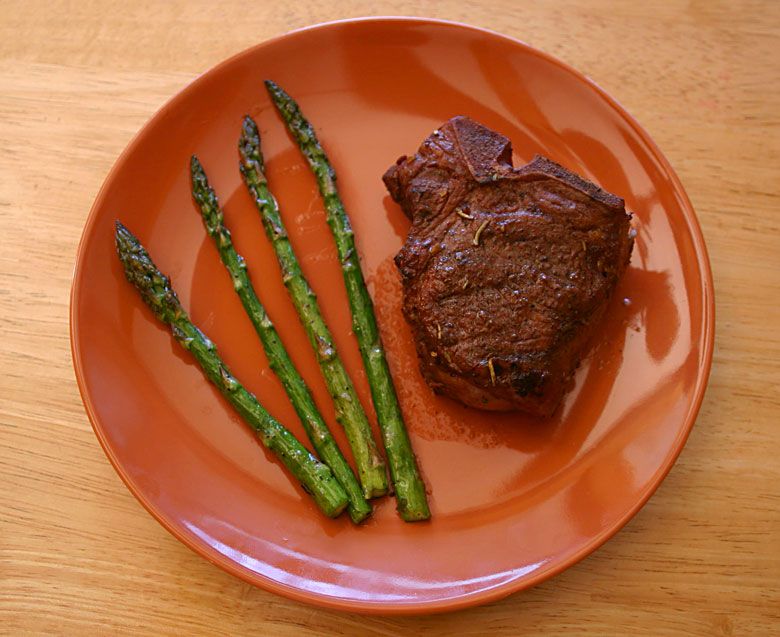
Coat the asparagus in the olive oil and season with salt and pepper. When you move the chops to the cooler part of the grill, throw the asparagus on the hot side of the grill (perpendicular to the grate, of course!) and make sure you turn the asparagi by rolling them so they grill up quickly on all sides and don’t burn. When the asparagus is done, the chops should be done (I like my lamb chops to be medium-rare, just like my steaks). Enjoy!

grilledAsparagus

Crab Cakes with Mustard Sauce

Crab Cakes This is one of my wife Kristina’s favorites. I’ve spent years improving upon my recipe, which is kind of an “everything-but-the-kitchen-sink” version of crab cakes, but it still keeps the crab the center of attention, as it should be. Good crab cakes start with high quality crab meat and don’t add too much in the way of filler ingredients… If they’re almost falling apart as you’re cooking them in the pan, they’re put together right!

The mustard sauce goes really well with these crab cakes.

This recipe makes 4 large crab cakes, so it’ll either serve 4 or 2 with good appetites. If I make this for 4 I double the recipe and serve 2 crab cakes to a plate to make sure everyone has enough.

Ingredients, Crab cakes:

  • 1 lb. good quality lump crab meat
  • 1/2 red pepper
  • 1/2 green pepper
  • 1 small-medium onion
  • 1-2 stalks celery
  • 4 cloves of garlic
  • 1 cup panko breadcrumbs plus 1/2 cup for coating the crab cakes
  • 1 tablespoon Tabasco Sauce
  • 1 tablespoon Worcestershire Sauce
  • 1 teaspoon Old Bay Seasoning
  • 1/2 teaspoon thyme
  • Juice of one lemon
  • 1 whole egg + 1 egg white
  • Salt and black pepper to taste
  • Cayenne pepper to taste (optional)


Ingredients, Mustard sauce:

  • 1/2 cup chicken stock
  • Splash of white wine
  • 2 heaping tablespoons of a coarse-ground spicy brown mustard
  • 1 egg yolk
  • 1 cup olive oil


1.
Coarsely chop the red and green pepper, onion, celery and garlic.

Coarsely chopped vegetables

2.
Put the vegetables in a food processor and chop them on the pulse setting until they’re very finely chopped up, but not pureed.

Food Processor

3.
Saute the finely diced vegetables in a pan with a little olive oil on medium heat until they soften up, about 8-10 minutes.

Sauteed Vegetables

4.
Add all of the crab cake ingredients except the eggs to a large bowl and combine. Mix well, but be careful not to break up the lump crab meat- the pieces of crab should be evident in the crab cake. I used high quality lump crab meat that comes in a 1 lb. refrigerated can. I don’t know if it’s sold in regular grocery stores- it may require a trip to a seafood market. I’ve also removed the meat from crab legs to make the cakes but obviously that’s going to be time-consuming. If you go that route, you’ll need somewhere between 2-3 lbs. of crab legs to get 1 lb. of meat.

I mix the ingredients without the eggs first, so I can taste without raw eggs added yet and make any seasoning adjustments. Then I add one whole egg and the white from a second egg, saving the yolk for the mustard sauce, and mix the egg in.

Crab cake ingredients

5.
Spread about 1/2 cup of the Panko breadcrumbs on a plate, divide the crab cake mixture into 4 and shape into tennis or baseball-sized balls. Roll them in the breadcrumbs to coat, and flatten them out a little bit. Start heating up the pan on medium-high with some butter and preheat the oven to 350 degrees (we’re going to finish the crab cakes in the oven).

Crab cake prep

6.
When the pan is hot and well-greased with the sizzling butter, add the crab cakes to the pan and cook long enough to brown them- about 4-5 minutes on each side. Be careful not to let them burn. Now comes the fun part…trying to flip each crab cake without them breaking up. I have pretty good success with a two-spatula technique- one below and one on top when you flip. Transfer them to a greased cookie sheet and put them in the preheated oven to finish. I like to use a meat thermometer to make sure they reach 165 degrees in the center.

Cooking crab cakes

7.
Now we make the sauce while the crab cakes are finishing up in the oven. Add the chicken stock, egg yolk, splash of white wine and 2 heaping tablespoons of spicy brown mustard to a blender. Mix well, then open the top and with the blender set on a low mix setting, slowly pour the olive oil in. Blending with the egg yolk creates an emusion- which just means oil and water-based elements that don’t normally mix well can now be combined. Now pour the sauce into a pan on low heat (I use the same pan to cook the veggies, brown the crab cakes and heat the sauce, just cleaning it out in-between). Make sure the heat is low and constantly stir, or the emusion will break and the olive oil will separate out of the sauce and it won’t look too good (it’ll still taste good though). If it does start to separate, sometimes you can get lucky and re-emulsify by pouring the sauce back into the blender and blending some more.

Mustard Sauce

8.
The sauce should thicken up and be ready in 10-15 minutes of stirring, just about the time the crab cakes are done in the oven. Add the crab cakes to the plate with a couple lemon wedges and whatever side veggie you’re serving (I did broccoli here but I often serve crab cakes with asparagus, which is really good with the mustard sauce as well). Creatively drizzle some mustard sauce on the plate and you’re ready to serve. Enjoy!

Finished crab cakes