Category Archives: Prep

Preparation

Curry Powder

Curry Powder

I’m back, after taking several months off. And what do I come back with after all that time– recipes for creative things to do with your Thanksgiving leftovers, like most food blogs will do this time of year? No, I have to be different. Why a curry powder recipe post on Thanksgiving weekend? It is actually related to Thanksgiving leftovers: We go to Kristina’s parents for Thanksgiving, so my only experience with cooking turkeys so far is smoking a whole turkey. But we get plenty of turkey leftovers to take home, so I used the bones to make a big batch of turkey stock, and then I used some of the stock and turkey meat to make this Curried Turkey Soup Recipe from Simply Recipes, which was really good.

Why go to all the trouble of making your own curry powder, when you can just buy it ready-made anywhere? And why do I keep asking and answering my own questions in this post? Well, there’s a couple reasons why it’s nice to make your own curry powder from scratch. And it’s really not all that much trouble. First, you start with spices in their whole, unground form, and unground spices will stay fresh a lot longer than when they’re purchased pre-ground. So your curry powder, made in small fresh-ground batches, will be at the peak of flavor. Also, you can adjust things to suit your taste. The mad scientist in me likes experimenting with amounts and types of ingredients to fine-tune what I like best.

Although I’m using my curry powder to try a recipe from the great Simply Recipes site this time, I’ll use this curry powder in my own chicken or lamb curry recipe in an upcoming post.

Ingredients:

  • 2 1/2 tablespoons coriander seeds
  • 1 tablespoon cumin seeds
  • 1 tablespoon mustard seeds
  • 1 tablespoon black peppercorns
  • 1 teaspoon fenugreek seeds
  • 1/2 teaspoon cardamom seeds
  • 1 tablespoon powdered turmeric
  • 1 teaspoon powdered ginger
  • 1/2 teaspoon powdered red chili pepper or two dried peppers
  • 1/2 teaspoon powdered cinnamon or two cinnamon sticks
  • 1/4 teaspoon powdered cloves or 3-4 whole cloves

1.
Go spice shopping! Hopefully you have an Indian grocery near you. If not, it may be difficult to find all the proper ingredients, so you may have to shop online for them. I recently stopped by an Indian grocery near where I work and stocked up on spices. Indian groceries are a great source to get spices very inexpensively. And not just spices typically used in Indian-style cooking– things like whole bay leaves are much cheaper than they typically are at other stores. Mustard seeds, chili pepper, and many other spices you can use in many different styles of cooking can be found here. I bought all of these spices for under $25.00:

Spices Purchased
2.
Measure out the spices. Now, the plan is to start with as many spices in their whole form as possible, so they can be ground up fresh. But you may not have everything in whole form on hand. In the picture below the only ingredients I started with in powder form are turmeric and ginger, because these related vegetables come in root form, not seeds, like many of the other ingredients. So it’s easier to buy these in pre-dried and pre-powdered form. Also, I didn’t have whole cloves, and whole dried cloves don’t grind up easily, so I used powdered cloves. You may not have whole dried red chilies or whole cinnamon sticks, so it’s perfectly fine to use chili powder or ground cinnamon instead. The spices that are best to start out with whole are the dried seeds– cumin. coriander, fenugreek, cardamom, mustard, and black pepper– because we’re going to further bring out the flavor of these by toasting them before we grind them up.

In the picture below, on the plate, in clockwise order starting with the peppers– whole dried red chili peppers, black peppercorns, cardamom seeds, fenugreek, mustard seeds, cinnamon sticks, coriander seeds and in the center, cumin seeds. In the small bowl, clockwise from the top are ground turmeric, cloves and ginger:

Curry Spices-Whole

3.
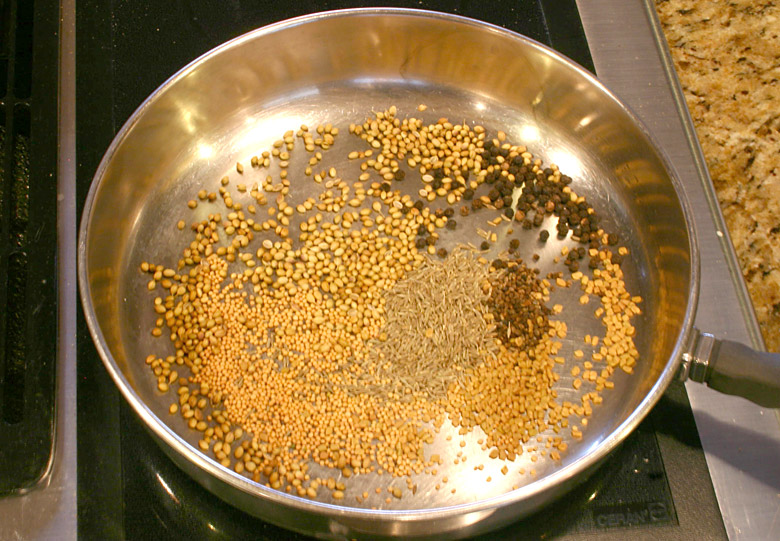
Now we’ll toast all of the dried seed spices– everything on the plate in the step 2 pic, except for the chilis and cinnamon sticks. just add the spices to a pan wide enough that they’re spread out in a single layer, on medium-high heat, and shake them around in the pan until they just start to lightly brown- careful not to burn them:

Toasting Curry Spices

4.
Now grind up all the whole ingredients, either in a dedicated spice grinder, food processor, or whatever you can use to get everything in powdered form. I use an old coffee bean grinder that I now use exclusively for spices. When the whole spices are mostly ground up I throw the pre-ground spices in for a few more spins of the grinder just to help mix everything up:

Grinding Curry Spices

This recipe makes about a 1/2 cup of curry powder, which (depending on how curried you like your curries) will probably be good for two meals. The unused curry powder will stay fresh in a sealed container for a few weeks. enjoy!

Soup Stock

Soup Stock

The stock

Even though the title is “Soup Stock”, stock is used for more than just soup base- sauces, gravies, and stews, and probably something else I can’t think of right now. We use stock in a lot of the recipes you’ll see here, so I thought I’d do a post on making stock now so I can link to it when I refer to recipes using stock. When we make stock we freeze it in portions to use later. You can use canned broth instead, and we do when we’re out of the homemade stuff. But if you really want your recipe to be special, using homemade stock is the way to go. By the way, you may wonder “what’s the difference between stock and broth”? Not much really, but stock is generally made just from bones while broth has meat added. Depending on how much meat is left on the bones you use, this recipe is somewhere between the two. We’ll use the terms “stock” and “broth” interchangeably on this site.

Stock can be made with either bones that are raw or bones from already cooked meat. Using the leftover bones from a whole cooked turkey  or a rotisserie chicken or two is a great way to make the most of your food budget. We like to take the turkey bones on the Friday after Thanksgiving and make stock and then a big pot of turkey soup– turkey bones make a great stock. The picture above is chicken stock, but the principle is the same whether you want to make turkey, beef, or even a seafood stock using shells from shrimp, lobster, and/or crab.  You can also use just vegetables and seasonings for a veggie stock. The ingredients below are what I used for this particular stock, but it’s really just a guideline– you can throw just about any veggies or seasonings in there for the stock.

Ingredients:

  • Bones, skin, whatever’s left when the meat is mostly gone
  • 1-2 Onions
  • Around 6 celery stalks (with leaves if available)
  • 4-6 garlic cloves
  • Handful of whole black peppercorns
  • 2 tsp. Dried thyme
  • 1 tsp. Whole celery seed
  • 1-2 bay leaves
  • 2-4 quarts of water

First, remove meat from the bones and save it for the soup if that’s what you’re going to make. You don’t need to clean the meat off the bones too thoroughly- meat left on will add flavor, and make it more of a broth, as mentioned. Put the bones, skin, etc- whatever’s left over after the meat is removed- in a large pot.

Chop the vegetables coarsely. You don’t have to do much cutting, and you don’t even have to remove the skins on the onion and garlic if you don’t want to- it’s all flavor. Throw the chopped vegetables and the rest of the ingredients in with the bones. Notice there’s no salt added- I keep the stock low-sodium until I decide what I want to use it for. If you add salt now it will be too salty if you want to reduce the stock later. Fill the pot with water until it covers everything by an inch or two. You want to end up with a lot of stock, but not so much water it dilutes the flavor. Put the pot on the stove and turn the heat on high until it just starts to boil– then turn the heat on low, cover the pot and simmer. The water should just barely be bubbling. Let it simmer for at least 4 hours to make sure to get all the flavor. You can’t really cook it too long, but more than 5-6 hours is probably overkill.

Once the stock is done simmering, pour it through a mesh sieve into another pot to remove the solids. If you want really clear stock, you can use cheesecloth in the sieve to strain out all solids. Now it’s time to remove the excess fat from the stock. There are two ways to do this:

  1. if you’re not going to use the stock right away, you can let it cool to room temperature and then refrigerate it. Once it reaches refrigerator temp, the fat will be the solid waxy stuff on top, and it will be easy to remove. A tip for rapidly cooling the stock: put the pot of stock in the kitchen sink and fill the sink with cold water, up to the level of the stock inside, or until the pot is almost (but not) floating. Make sure the pot has a lid on it so sink water doesn’t accidentally splash in.
  2. if you do want to use the stock right away, let it sit for a minute so the fat comes to the top. If you have a large glass container to hold the stock it will be easier to see the “oil slick” of fat on top. Use a large serving spoon or ladle and carefully skim the fat off the top.

If you do refrigerate your stock, you may notice it solidifies and turns “jiggly” like jello. This is a good thing- it’s collagen from the bones. This makes for a better consistency to the stock-, and it’s one thing (along with the superior flavor) that distinguishes home-made stock from canned broth.

Put any stock you don’t use right away in the freezer. I use quart-size plastic freezer bags with the date written on them. You should use frozen stock within around 6 months.